Saturday, November 19, 2011

Wedding Bells and Pretty Flowers!


Almost immediately after getting engaged, I went dress shopping.  Three stores, a lot more than three websites and countless dresses later, I found my dress.  Since the wedding wouldn't be until almost two years later, what was my hurry?  Pregnancy.  Back then I was fairly thin.  Right now I'm the size of a house (my excuse: I, like a house, do have a person living inside me).  And when I get married I will be thin again.  I have to be.  I'm too frugal to buy a dress and not wear it.  So the dress is more than just a dress, it's my inspiration to get back to my original size. 
Seeing as this is not a blog about weight loss, you may be wondering what my little story has to do with anything.  Well here's the connection, my dress is perfect... almost.  It's fitted in some spots and flowy in others, the perfect mix of modern and princessy.  It's just so me.   But there's this one thing I just don't love -   A flower (I guess) embellishment that just doesn't seem to go with the rest of the dress.  I wanted something bigger, more dramatic, more in line with the look of the dress and most importantly more ME.  How to make it more me?  Make it myself of course.  And that is why I came of with this hand beaded Swarovski crystal flower made from breezy chiffon, sparkling tulle and organza.


It took a little patience to come up with something I really liked.  The first flowers ended up in the trash, but I kept trying until I had something worthy of making my almost perfect dress into my prefect dress.  Now that I have the method down, I've been using these flowers for other projects as well.  I made two smaller ones to embellish my shoes (which will alsohave Swarovski crystals on them).  I've been experimenting with hair pieces, clips, fascinators, combs etc.  I haven't chosen a veil style yet, so right now I'm just having fun with different ideas.  
Anyway they don't have to be wedding flowers.  Use it as a DIY decoration in your home, make colored ones for your hair.  You could even decorate your Christmas tree with all red ones.  Use your imagination and get creative.  Here's how to get started:


I Love You THIS Much (w/ Video)

Here it is... Isla's video on how to make a card (with a little help from Mama) like the one she made for her Daddy.


This one is definitely not a nap time craft.  In fact you can't make this one without your child.  Sometimes it's more fun to do a project together and I just LOVE how much Isla gets into it.  She really loves painting.  "I want to do it again... again... AGAIN!"  So much fun!  So if you have a little cutie who loves to help out with all your projects, why not try it together?


Wednesday, November 16, 2011

"DIS Much!"

We have a little saying around here, especially at bedtime, but it's good anytime.  "I love you THIS much!"  And we stretch our arms out as far as we can to show how much.  It all started at bedtime.  When I put Isla to bed, I would say that to her.  One night, to my surprise (and delight!), she said "Mama, waffuu DEES much!"  Now she says it (along with everything else) much more clearly.  "I wuv you DIS much!" in her sweet little voice is one of my favorite things to hear.  We all say it to each other, and Isla totally melted my heart when she said it to my belly, "Baby Sister, I wuv you dis much!!!" accompanied by a kiss.  Sooooo cute!  So when Scott asked where it came from, I told him I started saying it to her, and she picked it up.  Then I realized, it didn't start with me at all.  It started with this little guy.
Or one that looked a lot like him.  He used to be on my parents dresser, and I always thought he was cute.  I guess his cute little saying just stuck in my head.  Isla was the first person I ever said it to, and now it's our little saying.  I'm sure we'll teach it to Baby Sister too when she gets here.  I can't wait!
So what does this have to do with my craft blog?  Well I told you from the beginning, I might include some adorable Isla stories, so I could just leave it at that, but this one actually does have a craft to go with it - a simple fun do-it-with-your-child paper craft.   Isla and I made something for her Daddy, and it all came from our little saying.  Coming this Friday (11/18/11), a video showing you our newest and possibly cutest craft ever, so easy too.  It's something you could make for Father's Day, Mother's Day, Grandparents Day, Christmas, Valentines Day, a birthday or just because.  Make it with your child.  It's so much fun spending the time together, and if your child is anything like Isla, she will be so proud to make something for someone she loves... DIS MUCH!
Don't forget to check back Friday to see the video starring (of course) Isla!

Friday, November 11, 2011

Etched Glass Wine Bottle


If you read my last post on glass etching, you know I love it!  It's a fun way to personalize anything... well anything made of glass anyway.  So as I was sitting at my computer blogging away, staring directly into my kitchen one nice nap time, I noticed a bottle of wine... the white muscadine grape wine we bought on our summer vacation.  It sounded delightful, so refreshing.  But I'm pregnant, so drinking it was out of the question.. And that's how the idea came to me.  A bottle of wine is a nice gift, but what could be better?  Wine in a personalized bottle.  You could add a wedding date and initials, "Cheers" and the year on New Years Eve, a name, a simple picture... anything really.  Etching just adds a special touch.  And that's what I decided to do.


Happy Etching!


Thursday, November 10, 2011

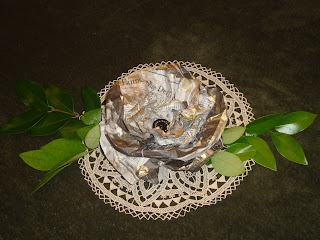
Recycled Roses


It's not actually the roses that are recycled, it's newspaper and other stuff you toss in the trash recycled into rose decorations.


With nothing but newspaper, cardboard (I cut up an old box) and hot glue, you can make these giant flowers. Add some optional buttons or baubles, paint or glitter, and get creative with it.


Use them to decorate anything you want.  I use these to make my recycled gift bag.
The only additional materials used for this are paper twist and 2 grocery store bags.


Hint: if you find a store that uses plain brown bags or bags with a small enough design to easily cover, stock up!  Request paper every time you go there.
To make make gift bag from a plain brown bag (actually you'll need two bags... just set one aside for now), cut a slit (about 3 inches for a large bag) down each corner and fold over twice (about 1.5 inches, then 1.5 inches again).  This helps make the handles sturdier and hides the sometimes rough looking top edges.  Tack that down with a little glue.  Cut two equal pieces of paper twist (about 4 inches longer than you want each handle), and untwist 2 inches of each end of each piece.  Glue the untwisted portions to the inside of the brown bag.  Use your other bag (the one you set aside earlier) to cut two equal sized rectangles (about 3 by 8 inches for a large bag).  Glue those over the ends of the paper twist attached to the inside of the bags.  This increases the sturdiness of the handles and hides the ends of the twist.  Now you have a simple gift bag.  And here's the fun part... decorate it.  For the recycled rose bag in my picture, make leaves and a stem with extra paper twist (or you could paint or draw them), securely glue the newspaper rose at the top of the bag with hot glue and voila!


A few additional ideas for the recycled roses:

A candle holder.  Skip the decoration in the center, add a little extra sparkle and shine with metallic paint or glitter.  I don't need to tell you paper is flammable, but just so I don't get blamed for any house fires...  Either use a large pillar candle (like the one pictured) or if you're using something smaller like a votive, put it in a glass votive holder.  Don't leave candles unattended, blah, blah, blah... next idea.


Top a present.


Doily + Real Leaves = Centerpiece.  If you're setting up a long table, decorate with a row of mismatched (preferably vintage) doilies down the center topped with recycled roses and real leaves instead of a table runner.


That should get you started.  As always, get creative with it, and come up with your own ideas.  Send pics - I'd love to see them!

Monday, November 7, 2011

Sketch a Etch

As I plan my next video, I have so many ideas.  This is currently one of my favorite things to do.  It's also great to Christmas gifts as well as gifts for any other occasions...  Glass etching.  I'm only going to show one idea in my video, just to demonstrate the technique, so since there are just so many fun way to use etching in your creative projects, I thought I'd share some additional ideas here.  And of course you can come up with your own.  With my method you don't have to buy those expensive stencils - if you can sketch it, you can etch it (just don't try to get to intricate with your sketching). 

Here's what I use: masking tape, a pencil, a hobby knife (I use an X-acto knife), a synthetic brush and etching cream...

Armour Etch is what I use.  I know there are other kinds out there, but I can't say how well they work or if my methods work as well with them because I started with this, liked it and it's the only kind I've used.
Before I start listing some of the great gits you can make with this, a few safety tips:  Work in a well ventilated area.  Wear protective glasses. Wear gloves.  Never ever get this stuff on your skin.  I must admit (since you'll probably notice this in my video anyway), I don't actually follow the goggles and gloves rules.  I'm just really careful, but please do as I say not as I do, or at least be really, really careful.  And if you do happen to get it on you, don't say I didn't warn you.  There now that I sound just like your mother (that's my job since I am a mother myself now), let's get on with the fun parts!
You'll have to wait until Friday (11/11/11) for the video, but here are some gift ideas.


- Buy (or recycle) a vase.  Etch the shape bow on the front of the vase with the ribbon going all the way around.  Fill it with flowers for a gorgeous hostess gift. In the vase pictured above, I also used glass enamel to highlight some of the edges.
- Buy a few of those plain, cheap votive candle holders and some scented candles and spell a word or name with one letter on each candle holder.
- Use a one quart plain canning jar to make a pretty layered cookies in a jar mix (use my recipe at the end of this post or just google "cookie mix in a jar" for pretty much any kind of cookies or brownies you can imagine).  Then either monogram the jar with the recipient's initial or if it's for Christmas you could make a simple festive shape like a Christmas tree or star.  I noticed some recipes for Gingerbread Cookie Mix in a jar when I was searching to see what's out there.  A simple gingerbread man etched on that jar would add so much personality!
- Clean out a pretty jelly or jam jar with soap and warm water, etch the word "relax" and fill it with home made bath salts. 

The possibilities are endless!  And the process is addicting.  You could very possibly think of something to etch for everyone on your Christmas list.  So put on your elf hat and get to work.  If you become an etching addict, don't say I didn't warn you (ohhh no, there's that mother thing again... sorry!).
Oh and I forgot to tell you one of my favorites... Actually I didn't forget - I just want to make you want to watch my video Friday.  So get excited because it's going to be good :)

And here's a cookie mix in a jar recipe I like:

Cranberry White Chocolate Elf Cookies

Ingredients:

  • 1/2 cup white sugar
  • 1 1/3 cups all-purpose flour
  • 1 teaspoon baking powder
  • 1 teaspoon baking soda
  • 1/4 teaspoon salt
  • 3/4 cup dried cranberries
  • 1 cup white chocolate chips  
  • 1/2 cup packed dark brown sugar
  • 1/3 cups rolled oats
 Directions:
  1. Mix the first 5 ingredients together and pour into the bottom of 1 quart jar.  Layer the rest of the ingredients on top in the order listed. Press each layer firmly in place before adding the next layer.
  2. Include a card with the following directions:                                                                                                                                                                                                                       Preheat oven to 350 degrees F. Grease cookie sheets.  In a medium bowl, mix together 1/2 cup melted butter or margarine, 1 egg, and 1 teaspoon of vanilla. Stir in the entire contents of the jar.  Shape into walnut sized balls. Place 2 inches apart on prepared cookie sheets. Bake for 11 to 13 minutes in the preheated oven. Transfer from cookie sheets to cool on wire racks.  Enjoy!

Saturday, November 5, 2011

Turkey Time!


Okay unless you are (or live with) a cookie freak with a serious sweet tooth, you're going to have to take a trip to the store for this one (sorry), but they're so cute, I think it's worth it.  Plus everything you need is available at the grocery store, and don't you have to go there anyway?  Just add this to the shopping list:
Nutter Butters, Vanilla Wafers, Anna's Ginger Thins, Candy Corn and Royal Icing (or make your own - simple recipe to follow). 
Got everything?  I'd write about how to make these, but it would take forever, bore you, and make about zero sense, so just watch me to do it... so much easier!


And one more idea:  Skip the Vanilla Wafers, and make cupcake toppers by pressing the head and tail into into the icing.
Happy Thanksgiving!!!

And here's the recipe, as promised, for easy royal icing:
One Egg White (the sugar preserves the egg whites, but if you're worried about it, you can get pasteurized eggs whites and use 1/4 cup)
One and a half - two cups Powdered Sugar
Half teaspoon Vanilla Extract 
With an electric mixer beat the egg white until peaks form, slowly add the sugar and continue beating on low until smooth and thick enough that when you lift the mixer, the ribbon of icing that falls from it stays on the surface of the icing for a few seconds.
Use immediately or store in an airtight container or it will harden.


Friday, November 4, 2011

Poppy Pattern and Random Ramblings


If you watched my Poppy Headband video, and you're here for the pattern, here it is: 
http://www.docstoc.com/docs/document-preview.aspx?doc_id=101650270
Print it and use it as much as you want.

If you haven't seen the how-to yet and want to make this, watch it here:


And now, a little bragging...  I made two of these (so far), one for myself and one for my daughter, Isla.  The felt cost twenty cents.  I already had buttons, black elastic, needle and thread, paper, scissors, hot glue and tape (all pretty basic stuff for a mommy to have around the house).  So this craft only cost me ten cent each to make!  Pretty good considering that you can use it as a cute gift topper for Christmas, and even a cheap bow costs more than that.  Ahhh it feels good to save money!  Plus why not top your presents with something cute and wearable instead of a bow that will probably end up in the trash?


A quick money saving tip:  Save all your buttons and beads.  Just throw them in a box to look through whenever you need one.  If you have an old sweater or shirt, that isn't even worth donating, the buttons are probably still in perfect condition - cut them off and save them.  The extras that come with a new article of clothing - throw those in your box too (if you do loose one, you'll still have them, but you can use them for other projects too).  And any old beaded costume jewelry?  Save the beads too.  I remember my mom used to keep a Tupperware container full of buttons, and on rainy days, sometimes my sister and I would get to dump it out and sort through it.  Now that I mention it, that doesn't sound like so much fun, but believe me it was.  Not only did my mom have those for anything she needed a button for, it also provided hours of entertainment to her girls.  I thought they were sooooo pretty, and sometimes, if we were really lucky, we could even pick one out to use on a craft project of our own.  My sister and I started our own bead and button collections, and I still have two boxes full that I use for my projects now.  And they are still soooo pretty.  Maybe when Isla is a little older, she'll think it's fun to dig through mine looking for treasures and creative inspiration.

Thursday, November 3, 2011

Reeeeelllaaaaax!!!

Be still...  Today I have relaxing and letting go of stress on my mind--Not because I have time for it, but because I don't.  So here are a few, profound, cute, funny or just likable quotes about the subject:
"Be still, and know that I am God." (Psalm 46:10)
"The time to relax is when you don't have time for it." (Attributed to Jim Goodwin and Sydney J. Harris)
"For fast-acting relief, try slowing down."(Lily Tomlin)
"Give your stress wings, and let it fly away." (Terri Guillemets)
"Don't underestimate the value of doing nothing, of just going along, listening to all the things you can't hear, and not bothering." (Winnie the Pooh)
"There is more to life than increasing its speed." (Mohandas Gandhi)
"The quieter you become, the more you can hear." (Baba Ram Dass)

So what does any of this have to do with my crafts, projects and ideas blog?  Believe it or not, there is a connection - two connections actually.  First, my simple paper craft for today (video posting tomorrow, 11/4/11) is so easy and relaxing, you don't even have to think as you do it (always a plus for a busy mommy, right?)  And second, pick your favorite quote because you're going to need it to make one of these sweet thinking of you gifts.  It's tea time in an envelope, a simple reminder to take a moment for yourself, a moment to just be. 


There it is!  Your sneak peak at what Isla and I will be doing today.  I'll even give you a  supply list, so you can get everything in advance, if you want to make some of these for friends who need to remember to take a moment for themselves (make yourself one too!)
For each one:
One 12" x 12" sheet of paper (double sided scrap-booking paper is perfect!)
A tea bag or hot chocolate packet
A cookie, scone or treat of your choice(make it or buy it)
A cellophane bag (available at ay craft store, Wal-mart, etc.)  You can substitute a piece of plastic wrap in a pinch.
A scrap of ribbon (just enough to tie a bow)

You probably have some of this stuff around the house, but even if you have to buy every single thing on the list, you can make these for less than the cost of buying a Hallmark card, and of course they are more personal and in my opinion, definitely more fun to give and receive.  So make yourself a nice cup of tea (Or coffee, hot chocolate, apple cider--whatever relaxes you), take a deep breath, take another one, and just enjoy a nice stress free project and hopefully a stress free day.